> For the complete documentation index, see [llms.txt](https://documentation.script.tv/llms.txt). Markdown versions of documentation pages are available by appending `.md` to page URLs; this page is available as [Markdown](https://documentation.script.tv/nodes/lightning-node-overview/validator-lightning-node-setup.md).
# Validator / Lightning Node Setup
## Hardware/OS requirements
* 16 Gb HD, 2 cores, 8 GB Ram
* Debian 12 GNU/Linux Operating System.
## How to set up your Lightning node
### The Easiest way: NaaS
Using a Node-as-a-Service (NaaS) service provider consists in delegating all technical aspects to a service provider.
Nodeops providers who support Script Network nodes:
```
* [https://nodeops.xyz](https://nodeops.xyz)
```
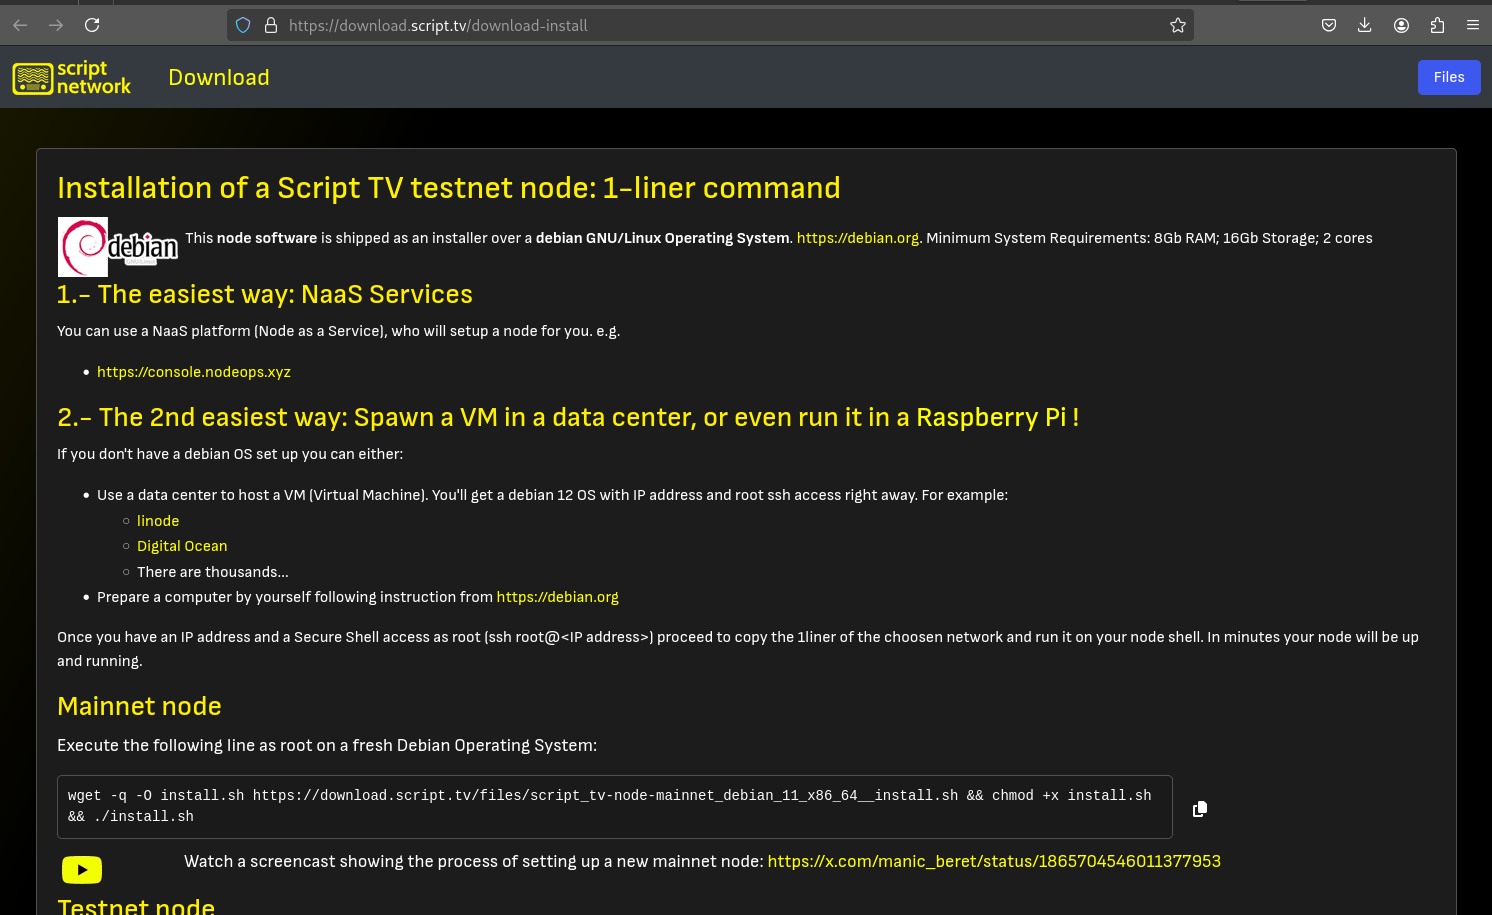
### The 1liner Installer
You would allocate a debian Operating system and run the 1-liner installer, converting it into a node in minutes.
The downloads screen provides access to different method for running a node.
Support for node installations has been discontinued for platforms Windows and Mac.
Here are the steps: [https://download.script.tv](https://download.script.tv/)
screenshot__downloads_1liner
This is the sequence of steps for a manual installation:
* 1.- get a debian-12 VM in a datacentre or as a raspberry pi or headless computer. (e.g linode.com, digitalocean.com)
* 2.- ssh as root. (Priviledged access to the VM command shell).
* 3.- paste the 1-liner installer you copied from downloads page. Press Enter.
* 5.- wait for a few minutes… Voila! your node is up and running!.
* 6.- Follow on-screen instructions on further step like licensing and staking your node.
### stv - The CLI interface
`stv` is the command you’d use to operate the node.
Have a detailed explanation of its functions in the sysop manual, available at
sysop_manual
[script\_tv\_\_stvtool\_manual.pdf](https://download.script.tv/files/script_tv__stvtool_manual.pdf)
A walkthrough video is also available at
More on `stv` below.
### Developer node
* Build it all from sources. for devs and devops.
Follow instructions at our github page:
## You have successfully completed your node setup.
All following items check out:
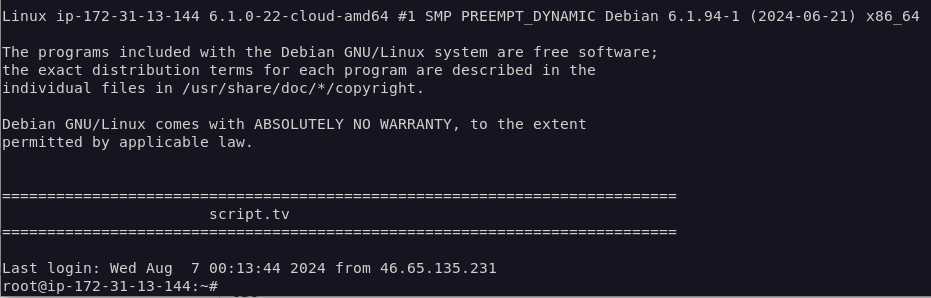
* ssh as root to your node. This action is perfomed ideally by muscle memory, but much better providing seamless experience is to set up [passwordless authentication](https://linuxize.com/post/how-to-setup-passwordless-ssh-login/)
```
linux/Mac: `ssh root@`
Windows: `putty` [download](https://www.chiark.greenend.org.uk/~sgtatham/putty/latest.html)
```
screenshot__user_node_root_login
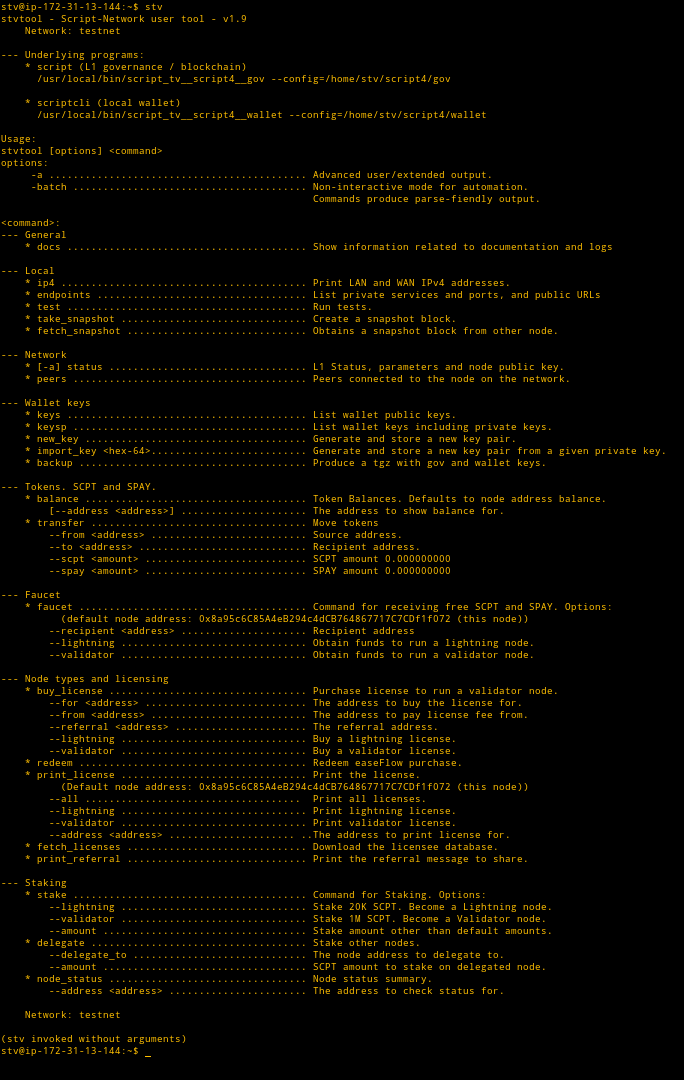
* switch to user ‘stv’ and go to home directory /home/stv (`stv`)
* run the program `stv`
screenshot__user_node_stv_scriptcli
## Automatic software updates
Automatic software updates feature is enabled by default. It can be disabled deleting the file /etc/cron.d/script\_tv\_updates and restating cron: systemctl restart cron
Check the [Release Notes](https://download.script.tv/files/release_notes.md.txt).
The document can also be found in the node at `/var/script_tv/release_notes.md`
### Node bash shell
#### About GNU/Linux
Main SYSOP interface: Text Command-line console, also known as **shell**.
Linux prompts. Line Prefixes is given by the computer to indicate us context: user and path
```
root:~$
```
SYSOP role operates under user `root`, and can control all aspects of the operating system. This prompt indicates that our path in the filesystem is `/root` (`root` home directory)
```
root:/home/stv
```
This prompt indicate we are SYSOP, although our current path in the filesystem is `/home/stv` (`stv` user’s home directory again)
```
stv:~$
```
Finally, this prompt indicates our hat is `Script-Network user` and that our current directory is home (`/home/stv`)
#### SYSOP/nodeop Role/hat: user root
Available commands for SYSOPs:
```
* script_tv__uninstall.sh # uninstalls the node software.
* script_tv__test.sh # subsystem health checks
* script_tv__ctl stop # stops all services for node maintenance
* script_tv__ctl start # resume all services after node maintenance
* cat /var/script_tv/data_sheet # Prints Operational Data sheet detailing daemons, URLs and ports used among other technical data.
```
#### SCRIPT P2P Network. Nodeops the linux user stv
Changing to user **stv** from `root`
```
root$ stv # change to user stv
```
Returning back to `root` user (SYSOP mode)
```
stv:~$ exit
root$
```
#### stv - the CLI Command-Line-Interface to the script network
the `stv` command is an alias to the program `bin/stvtool`. It must always been executed as user `stv`.
Some of the commands are mentioned here below, but the full documentation for stv with all its functions can be found at
 \[script\_tv\_\_stvtool\_manual.pdf]\([https://download.script.tv\]\\(https://download.script.tv/files/script\\\_tv\\\_\\\_stvtool\\\_manual.pdf)](https://documentation.script.tv/nodes/lightning-node-overview/https:/download.script.tv]\\\(https:/download.script.tv/files/script\\_tv\\_\\_stvtool\\_manual.pdf\))
**check the status:**
```
stv:~$ stv -a status
address 0x8a95c6C85A4eB294c4dCB764867717C7CDf1f072
chain_id testnet
current_epoch 10876
current_height 10874
current_hash 0x6e4dd911a67b4ae487149f293ca25420034c0b7355eb9b8bd1fb82e1c451f579
current_time 1734190399
eth_chain_id 42854
genesis_block_hash 0x42a81f3f7ef0a5297997c8428ae945d5176f07082224b006f1979a5ebbe2744c
latest_finalized_block_epoch 10874
latest_finalized_block_hash 0x7dd26a35e3072be28419fcbd2cebbb1024ba095ee6991722bf6a7760982f430c
latest_finalized_block_height 10874
latest_finalized_block_time 1734190387
peer_id 0x8a95c6C85A4eB294c4dCB764867717C7CDf1f072
snapshot_block_hash 0x7375fa6eeb782e5534b879ec5243e2bd549223a0ac077cd3c5ae32ec405c34eb
snapshot_block_height 4397
syncing false
tip_hash 0x1079b1f24757f1900d2c6b3e7d6aa0aab213953791aec442dc7f2433c8a9b8b5
explorer_progress_height 10873
```
From the returned information we learn:
* Our node address is `0x8d1F3236d790415d631d554091dE7A25913FB561`
* we are on `testnet` network
* our peer\_id is our node address, for node-node communications.
* The genesis block hash `0x42a81f3f7ef0a5297997c8428ae945d5176f07082224b006f1979a5ebbe2744c` must match on all nodes of this network.
* Other information about the chain: block height, last block (`current_hash`).
* Syncing indicates the type of activity that is going on. true/false indicates whether an sync activity is ongoing or not.
Your keys are stored in directory `/home/stv/script4/wallet/keys/plain`
```
stv:~$ find script4/wallet/keys/plain -exec cat {} \;
{"address":"8d1f3236d790415d631d554091de7a25913fb561","privatekey":"d8604ad2430cd7292c1374838c4ffee8edb5a6723f4ca3cb8d1e8e8bab28c905","id":"0fc641f5-18c3-47ea-ba7d-83126ea0e32
```
As protection against loss, we encourage you to backup the keys directory.
### Backup
Use `stv backup` to produce a downloadable file with your keys: It provides with `scp` commands ready to be executed in remote computers to fetch the backup, either from inside the LAN or from internet (WAN).
```
stv:~$ stv backup
Deleting previous backup files
find: unknown predicate `-maxdepth=1'
Copying gov key from /home/stv/script4/gov/key/
Copying wallet keys from /home/stv/script4/wallet/keys/
Backup file available at /tmp/keys_0x8a95c6C85A4eB294c4dCB764867717C7CDf1f072_testnet_user_20241214153540.tgz.
=============================================================================================
Backup file is ready for download:
Retrieve from remote computer using either command:
from LAN: scp root@555.31.13.144:/tmp/keys_0x8a95c6C85A4eB294c4dCB764867717C7CDf1f072_testnet_user_20241214153540.tgz .
from WAN: scp root@555.134.4.199:/tmp/keys_0x8a95c6C85A4eB294c4dCB764867717C7CDf1f072_testnet_user_20241214153540.tgz .
Restore directory (gov key): /home/stv/script4/gov
Restore directory (wallet keys): /home/stv/script4/wallet
=============================================================================================
```
### testnet Faucet:
Obtain testnet tokens from our faucet at script.tv
Every script node has a faucet service that would -kindly- transfer you funds on request. The objective of testnet is to give users the opportunity to test the system using ‘play money’.
However if we run a mainnet node we would use an exchange and buy tokens instead.
Using stv CLI tool you would invoke faucet this way:
```
stv:~$ stv faucet
Tx 0x0c91f018443240fc69cc438e793045966ef350da22bf19eca9ba6a1746e3b68c
Explorer link: https://explorer-user-testnet.mm.cto.script.tv/txs/0x0c91f018443240fc69cc438e793045966ef350da22bf19eca9ba6a1746e3b68c
Funds will arrive in seconds, check balance.
```
And seconds after verify balance:
```
stv:~$ stv balance
Address 0x8a95c6C85A4eB294c4dCB764867717C7CDf1f072
SCPT: 1000.000000000000000000
SPAY: 100.000000000000000000
```
The command can be repeated as many times as wished up to a balance limit of 1M. We can easy earn tokens this way.
By feeding with tokens your `node address` your faucet is automatically enabled using it as source of funds and making the faucet service available to other participants in the script network.
### Lightning node. Main setup workflow.
Lightning nodes are nodes that cooperate securing and guaranteeing its resilience and reliability, forming a trustable network of untrusted nodes, following the breakthrough by Satoshi Nakamoto.
In order to become one your just installed node must be upgraded.
The steps for upgrading the software are:
* acquire 20.000 SCPT (or tSCPT for testnet)
* purchase a Lightning license.
* stake the node.
With the stv interface:
```
stv:~$ stv --lightning faucet #only on testnet
stv:~$ stv --lightning buy_license
stv:~$ stv --lightning stake
```
An example of such run is:
```
stv@:~$ stv --lightning faucet
Faucet for lightning.
Tx 0x14f85252c2175e1290c1924b0d4630df6333fa45d22ea5d505128b34a318cb93
Explorer link: https://explorer-user-testnet.mm.cto.script.tv/txs/0x14f85252c2175e1290c1924b0d4630df6333fa45d22ea5d505128b34a318cb93
Funds will arrive in seconds, check balance.
```
```
stv@ip-172-31-13-144:~$ stv --lightning buy_license
=========================================
License Purchase
=========================================
You are about to purchase a lightning license for the node address: 0x8a95c6C85A4eB294c4dCB764867717C7CDf1f072.
The license fee of 20000 SCPT will be paid from the address: 0x8a95c6C85A4eB294c4dCB764867717C7CDf1f072.
The transaction will be sent to the Script Network node address: ad5448ab1687f6473715fcb789a2208d14eb9d5e.
continue? [yes|ctrl-c]
yes
Sending 20000 SCPT to ad5448ab1687f6473715fcb789a2208d14eb9d5e
Waiting for transaction to be included in a block
Payment transaction link: https://explorer-user-testnet.mm.cto.script.tv/txs/0x462ff44d189a639e95f1ee69eb92204b142af62ffd8540bae5492c205380eb4d
Waiting 100 seconds...
(Please be patient. Don't cancel the process there are steps needed to be done)
License purchased successfully
Transfer refund in progress. Transaction id: 0x684fe71463e5a4ba12297d0c2002c05bb9e69f857c835a0c8511e0dec39f2c62
Link to the refund transaction: https://explorer-user-testnet.mm.cto.script.tv/txs/0x684fe71463e5a4ba12297d0c2002c05bb9e69f857c835a0c8511e0dec39f2c62
```
```
stv:~$ stv print_license
=========================================
LICENSE FOR 0x8a95c6c85a4eb294c4dcb764867717c7cdf1f072
=========================================
| Licensee Address | 0x8a95c6c85a4eb294c4dcb764867717c7cdf1f072 |
| License Type | LN |
| Issuer Address | 0xad5448ab1687f6473715fcb789a2208d14eb9d5e |
| Valid From | 1734192846 |
| Valid To | 4889866446 |
| License Items | LN |
=========================================
Total Licenses: 1
```
```
stv:~$ stv --lightning stake
Upgrading node to lightning
Transaction broadcast was successful.
TxHash: 0xc69494cc3e22d1a97132463e2369c4388a586f3777c91dd64230206cf9c4b433
Link to transaction: https://explorer-user-testnet.mm.cto.script.tv/txs/0xc69494cc3e22d1a97132463e2369c4388a586f3777c91dd64230206cf9c4b433
```
```
stv@:~$ stv node_status
Node is lightning with 20000.000000000000000000 SCPT staked.
Node status summary: Node is a lightning.
```
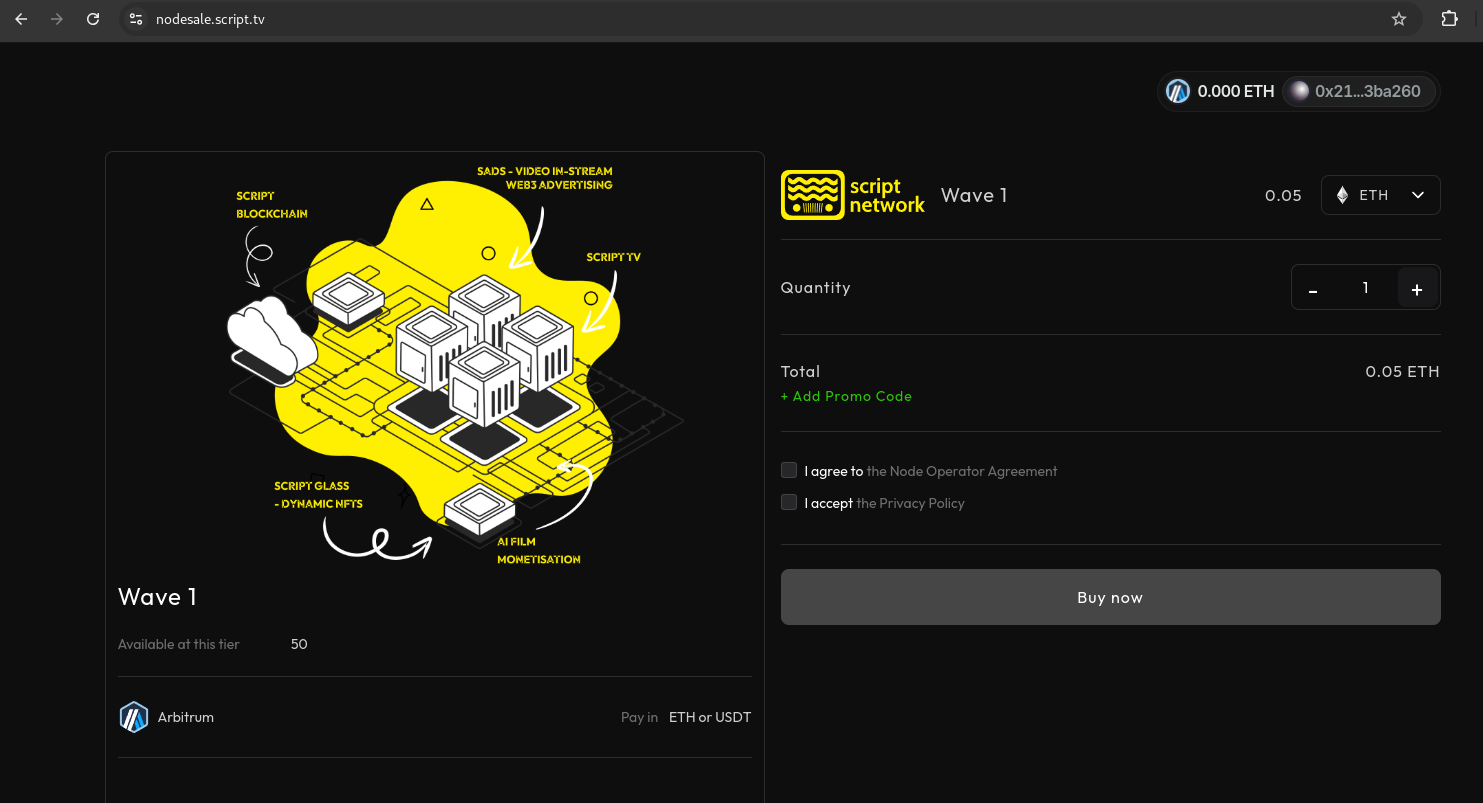
### Lightning node. Alternative setup workflow. Node Sale - FlowHale/easeFlow
screenshot__nodesale
For those who have purchased a license via
the steps for upgrading the node to lighning are:
```
stv:~$ stv redeem
stv:~$ stv --lightning stake
```
The redeem function will give you a personalized URL you would use to prove the ownership of the wallet with which you did the purchase. Once verified you would obtain a lighniung license for the node.
```
stv:~$ stv redeem
==================================================================================
Script Network - Lightning node licensing
Redeem easeFlow Purchase - https://easeflow.io
(Purchase portal link: https://nodesale.script.tv)
==================================================================================
Script Network - Lightning node licensing
=========================================
Its time to redeem your purchase making this node a licensed lightning node staked with 20K SCPT.
A special URL has been generated for you, which is associated with this node.
Please continue the redeem process on the following URL:
https://redeem-mainnet.script.tv/?ssid=XXeinGjNKa2e1aNRBzbObIIdf0vqZ3fKQQ3Kg1yA7nQflg4K2Ke8nzfMUUNgjwDAoj&msg2=yb2niry46wg6b34j5b9p7v
```
bring the given URL to the browser holding your wallet (the same wallet you used to purchase) `https://redeem-mainnet.script.tv/?ssid=XXeinGjNKa2e1aNRBzbObIIdf0vqZ3fKQQ3Kg1yA7nQflg4K2Ke8nzfMUUNgjwDAoj&msg2=yb2niry46wg6b34j5b9p7v`
Follow these 3 steps \* connect wallet \* sign message to prove ownership \* back to stv with further steps explained on screen